Tuesday, November 30, 2010

Mustache & Eyebrows

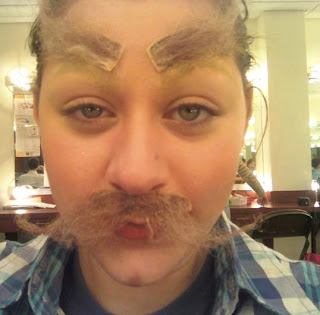
After learning how to make a wound appliance, we learned how to use latex to make a mustache and eyebrows using crepe hair.  This was a fun project.  When I first began adding the hair on my mustache I was a bit frustrated.  It was hard to get the hair in the right place in order to make it look realistic and as if it were really growing from a follicle.  After I had some practice on the mustache I had a much easier time on my eyebrows.  Below are some pictures.....


I first drew the shape of the mustache I wanted on paper.
This is my mustache after I added the crepe hair, but before I trimmed it.

 
This is the outline of the mustache on the lace.  It's sort of hard to see. There was a glare from the acetate.

In order to put the eyebrows on our face, we had to first soap out our eyebrows in order to make them disappear.  We then attached the eyebrows above our real eyebrows. Here are the pictures of that...


We first used the soap to flatten our eyebrows down.

 
Then we used makeup to cover them up.

Then we applied the appliances using spirit gum.  Here are the pictures of my final product:
I used the brown and blond crepe hair and blended them to make my mustache & eyebrows.

I gave myself a little cleft in my chin, which was surprisingly very easy.

Heh heh heh.

Smile!

Tuesday, November 9, 2010

Cuts & BLOOD!

Starting last Wednesday we started making cuts out of latex to apply to our skin.  I chose this picture to model my cut after....


I took some liberties with it... I designed the shape of my cut after the one above, but I made it larger and wider.  On Friday we used the spirit gum to adhere our pieces to our arms.  Here is a picture of mine right after I put it on:
Obviously there was some excess around the edges that I had to trim.  We then applied our base foundation to try to match the piece to our skin tone.  This is where I had some trouble.  I mixed the foundation I use for my face and found it to be too dark, so as Sue suggested, I used my highlight and went around the edges of my piece.  It did help, but it still needed some work. 
That's the closest I could get it in class.
We then added the makeup to the inside of the wound to make it look like a scar.  I added some purples and reds from the bruise & abrasion pot....

Then we added red and blood to make it look like a fresh cut...
BLOOD!     


I took note that I was going to have to work hard to match the skin tone once I put the wound on my face. On Monday when we put them on our faces, I had the same problem. I spent most of the time trying to match the color of the latex to my own skin.  I trimmed my appliance down a lot, hoping it would help with hiding the edges, but the inside edge was still a very visible.  Here's some step-by-step pictures:


Then we added color.  Along with the red inside of my cut, I added some bruises around my eye and along my temple....
That edge really bothers me. Grr.  
Then I added some blooood.     
It was very drippy.
And some morrre blood.


Next time I think I want to my cut deeper, but the outer edges thinner as to try to reduce visible edges.  That was my biggest problem I think.  If the wound had more depth, I think it would have been more realistic... or maybe just more gorey.  I'd love for you to comment with some advice!

Thursday, November 4, 2010

Blackeye & Bruises

On Monday we worked on creating believable bruising and a black eye.  I had a lot of fun with this.  It was interesting to see how the colors from the bruise & abrasion kit could be mixed to make a real looking bruise.  I practiced making one on my arm first and I feel that I was pretty successful.  I left it there for the rest of the day and my boyfriend asked me how I bruised my arm!  That was exciting.  Here's a picture of my bruise:


Then I moved on to my eye.  I started with looking at the picture Sue told us to look up.  I noticed that there was a reddish color directly under his lower lashes and then it slowly went into a deep purple so I tried to recreate that.  Here are some of my pictures.....


I think it looks pretty realistic.  Looking back I can see the yellow and I think it really looks like a healing wound. 

Mosaic!

Whew.  What a process!  On Friday I stayed after class to finish the left side of my face for the mosaic and caught the 11:20 shuttle.  I'm glad I stayed, and finished then.  I'm not sure I'd have quite the patience to do it all again. However, the second time around would probably be easier.  The final product was really cool and once I was done I really appreiciated all of the work I did to get there.
Here are some pictures as I went along.....


ta da! Looking back, I wish I would have done my whole face!  I did do my right eyebrow and my whole mouth, but it would have looked really cool if I had finished the whole thing...maybe I'll invert a picture to see what it would look like.. (even though I know my face isn't symmetrical.)


Something like that!

Tuesday, October 26, 2010

Old Age

Today I completed the old age on my entire face.  I liked working on my own and taking the time to fix mistakes and make discoveries. I finished in about an hour and ten minutes.  I feel that I did a much better job than I did on half my face last week.  I think I made an improvement in my eyes.  Last week I had a bit of trouble on aging my eyelid and today I got it to look like I wanted.  I made a curve with the highlight from the tip of my eyebrow downward toward the edge of my eyes and I put shadow under that.  It was effective in giving the illusion that the eyelid was heavy and sagging. When comparing the two pictures I noticed that making my lines darker is more effective. Here is a picture from last week when we worked on half of our face....
My lines were light and there is little difference in my mouth.


I look much older than I did last week.  I was able to add more to my lips and eyes and I think the overall product is much more effective.


For the wrinkles between my eyebrows and on my forehead, I scrunched my face and lightly traced over the creases with my eyeliner and then went back over them with highlight and shadow.  I found that to look more natural than what I did last week.

Feedback is appreciated!!

Thursday, October 21, 2010

From Morgue to Aging

Soo I'd like to start off by saying that I LOVE working on my morgue.  The rest of my classes for the past few weeks have been so stressful, but working on my morgue is relaxing and helps clear my mind.  I love that I'm able to be creative and work on something that is completely made up of things that inspire me.  I think I'm addicted to cutting things out of magazines now. 

We recently worked on adding weight and taking weight off. We added weight to the left side of our face and took weight off of the right.  I had some trouble with this one.  In class I wasn't seeing a vast difference between the two.  Looking back at the pictures I think the problem was that I didn't make the shadows dark enough.  At the time, I was afraid of making them look too dark and unnatural, but I suppose I will have to find a balance.  I actually think the right side looks heavier than the left and I'm trying to figure out why. I'm thinking I just wasn't making dark or light enough shadows and highlights overall... please comment with your observations!!


On Wednesday in class we worked on aging our headshots.  I enjoyed this exercise and it was very helpful.  I found new discovers with each line.  I could see what worked or looked natural as compared to what didn't and I learned that the eraser is a great tool in softening shadows and lines.  I will say that I'm a bit disturbed by my final product:


Is that scary or what?!

Tomorrow, we were told we could bring in pictures of older family members.  I feel that I favor my mom's side of the family, so I printed out a few pictures of my grandparents as well as my mom to bring in for tomorrow. I also want to put an age progression for my mom in my morgue since I have access to some old pictures of her.  She's only 44, but it's still interesting to observe the changes.  Here are some for you to look at:

My cute grandparents! My grandma is 75 and my pap is 83.   


I want to try to get ahold of my grandma's wedding picture. She was 19 and I think she looks the same! haha.

I'm trying to upload the pictures of my mom but they aren't working right now. grrr. I'll try again soon!

Thursday, September 30, 2010

I'm so excited that we've started with our real makeup! Once we started applying it, I noticed how necessary and helpful the color palettes are. It was especially nice during the dress rehearsals for Independence.  I knew what colors I had to mix for my foundation, shadow and highlights, since we had already done them in class. I also have to cover a tattoo on my foot and since my foot is a different color than my face I used the foundation palette.  It was very conducive in helping me find the exact color I needed instead of testing out something different every night.  Below are some pictures of my palettes and then my basic corrective. 

This is my color mixing chart for my foundation: 

This was the test I did on my arm, where I found 4 was the closest to my skin tone:


This is my palette for foundation:

I found that 2 & 4 are the perfect match for my skin tone. 


This is my palette for contouring:


This is my palette for bruises:


This is my basic corrective:

I had some trouble covering up the dark circles under my eyes.. I did the best I could!  


P.S.  I took these pictures on my phone so I apologize if they aren't the greatest quality!